
Calf
Calf Tattoo Stencil: Sizing, Mirroring, and Application
Direct answer
A calf tattoo stencil should be sized and applied to the standing leg rather than the seated one: the gastrocnemius fills out and sits higher under load, so a stencil laid on a slack calf reads short once the client stands. Most single-panel calf pieces run 12–25 cm (5–10 in) tall against a usable flat width of 11–14 cm (4.5–5.5 in) at the muscle belly, narrowing to 6–9 cm by the ankle. For a matched pair across both legs, flip the design before printing — InkLine's mirror control does it in one step — and measure both calves first, since they rarely match within a centimeter.
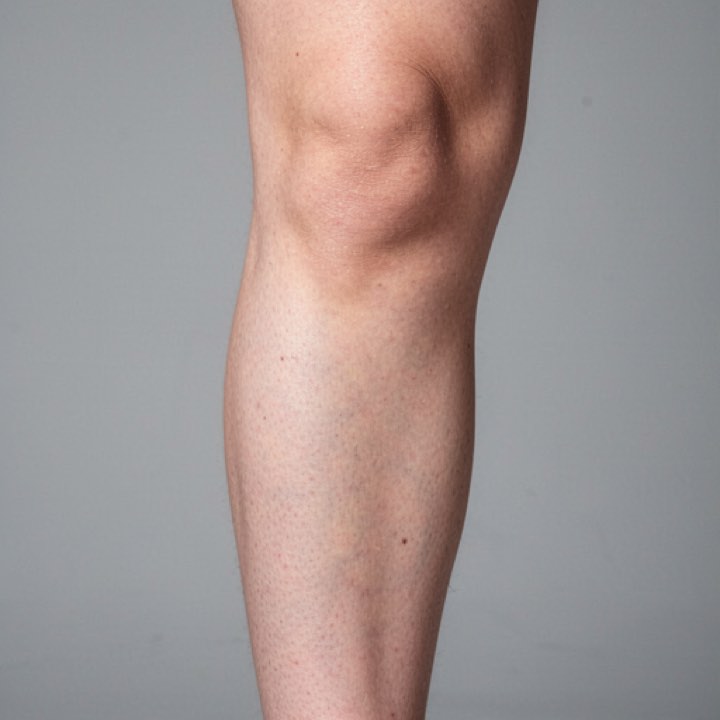
A calf is a tapering, double-curved muscle that is a different shape in the position you apply a stencil in than in the position the finished tattoo is seen in. That gap is the whole problem with this placement. Get it wrong and a design that measured correctly on the table sits short and off-center the moment the client stands up.
Size to the standing leg, and apply it standing
Measure the calf at its widest point, which sits roughly a third of the way down from the back of the knee. Most adult calves land between 33 and 43 cm (13–17 in) around. The usable flat width for one sheet is about a third of that number: 11–14 cm (4.5–5.5 in) at the belly, dropping to 6–9 cm (2.5–3.5 in) by the time you reach the ankle. Height is the generous dimension here. A 12–25 cm (5–10 in) tall design covers most single-panel calf work, and a piece running from the knee crease to the ankle is 35–40 cm (14–16 in), which is longer than any single sheet.
Now the part specific to this placement. The gastrocnemius changes shape depending on whether the leg is loaded. Standing with weight on both feet, the muscle belly is full and sits high. Sitting with the knee at 90 degrees and the foot flat, it slackens, widens, and drops. Pointing the toes contracts it and can shorten the visible panel by 2 cm or more. Your client will be lying prone or kneeling on a footrest while you tattoo, and standing for every photograph taken of the piece afterward. Set the stencil to the standing shape.
The sequence that works:
- Shave the whole panel plus 3–4 cm of margin. Calf hair is coarser and denser than arm hair, and one missed patch lifts the stencil in exactly that spot.
- Degrease thoroughly. Legs carry more lotion residue than arms, and residue is what lets a sheet slide during the hold.
- Have the client stand with weight even on both feet, then find the centerline of your panel: down the middle of the back of the calf from the center of the knee crease to the middle of the Achilles, or along the ridge of the outer head if you are working the lateral face.
- Apply a thin, even coat of stencil solution. Heavy application bleeds outward at the edges where you press hardest.
- Tack the paper down at the widest point first, not at the top or the bottom. That is where the surface curves most and where the sheet has the least tolerance.
- Smooth upward toward the knee, then downward toward the ankle, letting the sheet narrow into the taper. Never stretch the paper to make it reach the ankle end. That is what produces a design that looks pulled thin at the bottom.
- Hold for the full contact time without letting the client rise onto the ball of the foot.
- Peel lengthwise along the leg, never across it. Peeling across the curve tears the transfer at the edges.
- Dry 10–15 minutes, then check twice: once standing, viewed from behind and from the side at walking distance, and once in the actual tattooing position. A stencil that is right in only one of those two positions is not right.
What the taper and the double curve do to a flat stencil
An upper arm is close to a cylinder, and flat paper wraps a cylinder in one direction without wrinkling. A calf is not a cylinder. At the muscle belly it is convex vertically and horizontally at the same time, so paper laid across the full width has nowhere to go and creases into the design. The practical limits, zone by zone:
| Zone | Usable flat width | What it does to the stencil |
|---|---|---|
| Back of calf, at the belly | 11–14 cm (4.5–5.5 in) | Widest single panel; both edges fall off the curve at once |
| Outer (lateral) head | 9–12 cm (3.5–4.5 in) | Flattest plate on the lower leg; the face seen while walking |
| Inner (medial) head | 8–11 cm (3–4.5 in) | Rubs the opposite leg; the client can barely see it in a mirror |
| Lower calf into the Achilles | 6–9 cm (2.5–3.5 in) | Thin skin over bone and tendon; lifts every time the ankle flexes |
The second effect is proportional rather than mechanical. Because the leg narrows by roughly a third between the belly and the ankle, a design drawn as a constant-width band looks bottom-heavy on the body: the same 10 cm of width is a comfortable panel at the calf’s widest point and close to a full wrap at the ankle. Designs that narrow as they descend read as though they were drawn for the leg, because they were.
Length is where printing becomes the constraint. InkLine keeps a 5 mm margin at the paper edge, so a portrait sheet holds a design about 26 cm tall on US Letter, 27 cm on A4 and 33 cm on US Legal. A 12–25 cm calf piece fits on one page of any of them. A knee-to-ankle piece at 35–40 cm fits one Tabloid or A3 sheet if your printer takes that paper; otherwise it is tiled across two sheets that share a 15 mm strip carrying registration marks and a dashed cut line, then trimmed and applied on the leg one panel at a time. You type the stencil’s height in centimeters or inches, and that is the height of the lines on paper, with every sheet carrying a 5 cm check ruler to prove it printed at 100 percent. The home printing guide covers the print-dialog settings that most often come out wrong. For shop-volume work InkLine does not replace a dedicated thermal stencil printer, and it is not sold as one.
Mirrored pairs across both legs
Matching calves is the most common reason people ask about this placement, and the mechanics are simpler than the judgment. Flipping the design horizontally before you print gives you the second leg’s stencil, and InkLine has mirror and flip controls, so it is one step rather than a redraw. What flipping does not fix is anatomy and intent.
Anatomy first. Calves are not mirror images of each other. The medial head of the gastrocnemius sits lower and fuller than the lateral head on both legs, and most people’s two calves differ in circumference by up to 1–2 cm, usually with the dominant leg larger. A stencil that sits perfectly at 13 cm of width on the left calf can crease at the edges on a right calf that is 1.5 cm smaller around. Measure both legs before you commit to one size for the pair, and be prepared to print the second sheet at 90–95 percent. For a panel small enough that four copies share one sheet, InkLine’s multi-size sheet prints the design at 100, 95, 88 and 80 percent side by side; the copies are not labelled, so tell them apart by size, hold the set against the smaller calf, and print the second leg at whichever size sits without creasing. Larger panels are quicker to settle with one trial print on plain paper.
Intent second. A flipped pair placed on the outer face of each leg faces outward, away from each other, which is what most matched leg pieces want. The same pair placed on the back of each calf reads as one composition split down the middle, and then the flip decides whether the two halves meet in the gap between the legs or turn their backs on it. Text must never end up flipped, and neither should anything with a fixed reading direction, but InkLine’s mirror flips the whole image, lettering included. If the design carries text, flip the imagery and set the lettering the right way round again in your drawing app before you print the second leg. Decide which of these you are building before you print. The same reasoning applies moving up the leg to the thigh, where the flat field is much larger and pairing is looser.
Which styles follow the calf’s shape
Anything designed around a limb rather than dropped onto one does well here. Tribal work is the clearest example: its bands and blades were developed to follow the contour of a leg and taper with it, and the heavy closed shapes survive both the curve and the stretch. Japanese leg pieces do the same thing with flow instead of banding, running a subject down the length of the calf with background that narrows toward the ankle. Blackwork and ornamental panels sit well on the outer head, which is the flattest plate on the lower leg.
Fine, densely packed linework has a harder time. The calf is a high-stretch surface — the skin over the gastrocnemius travels noticeably between a pointed and a flexed foot — and hairline strokes spaced close together lose separation faster here than on the outer arm. That is a spacing decision at the stencil stage rather than a machine problem. If your lines are merging at transfer, open the gaps in the artwork before you change paper.
For extraction, Linework handles tribal, blackwork and traditional work cleanly, because it keeps near-black areas as solid fills instead of outlining them; Outline gives the barest contour when you would rather fill freehand. For shaded calf panels, Tonal maps the shading into two to four shadow levels, drawn as dotted lines and hatching rather than grey, and Dotwork renders it as stipple. Below roughly 1000 px on the long edge, a reference photo cannot be rescued into a clean stencil in any mode; at that point you are redrawing rather than converting, and admitting that early is faster than fighting the sliders. The centerline-first application logic here is the same one used on the upper arm, which is a gentler curve with a very different failure mode.
Honest notes on pain, swelling, and aging
The calf is a middling placement for pain across the middle of its span and a hard one at both ends. The muscle belly has depth underneath it and most people handle it well. The back of the knee and the thin skin high on the inner calf are tender and mobile. The lower calf narrowing into the Achilles has bone and tendon close under the surface and is generally rated among the sharper spots on the leg. Tell a client which zones their design crosses before the session rather than during it.
Swelling is the calf-specific variable nobody mentions. Lower-leg circumference commonly rises over a day on your feet as fluid pools, on the order of a centimeter. A stencil applied to an evening calf was measured on a slightly larger leg than the one that walks out of the shop next week. It is not enough to ruin a piece, and it is enough to explain why a band that felt snug at application looks marginally loose later. If you are sizing a wrap that has to close precisely, measure in the morning and note the time.
Over years, calf size tracks training more visibly than most placements. Runners and cyclists change lower-leg volume in both directions across a few seasons, and a design with tight internal symmetry — a precise grid, a mandala centered on the belly — shows that drift more than a flowing composition does.
One limitation worth stating plainly: InkLine’s on-skin preview is an AI-generated image of the design on a generic calf — not your client’s leg, and not a measurement of how a design sits on a curved, tapering surface. It is useful for general placement and proportion, and it will not tell you that the bottom of your panel is about to wrap the ankle. A tape measure and the two-position check after transfer are still what settle it. InkLine is a free download, and the manual stencil workflow — processing, editing, print layout, and export — is free up to an allowance on how many images you carry through it, and asks for a subscription past that; AI generation uses a credit system.
Free stencils that suit this placement
Frequently asked questions
Should a calf tattoo stencil be applied standing or sitting?
Standing, with weight even on both feet. The calf muscle sits high and full under load and slackens and widens the moment the leg is unweighted, so a stencil applied to a seated calf can read 2 cm short and slightly low once the client stands. Tattoo in whatever position is comfortable, but set the stencil to the standing shape.
How do I mirror a calf stencil for a matching pair on both legs?
Flip the design horizontally before printing rather than redrawing it, then measure the second calf separately. Most people's calves differ in circumference by up to 1–2 cm, so the mirrored sheet often needs printing at 90–95 percent to fit the smaller leg without creasing at the edges.
How tall can a calf tattoo stencil be on one printed sheet?
About 26 cm (10 in) on US Letter, 27 cm (10.5 in) on A4 and 33 cm (13 in) on US Legal once the edge margin is subtracted, which covers most single-panel calf designs. A piece running from the knee crease to the ankle is 35–40 cm: one Tabloid or A3 sheet if your printer takes that paper, and otherwise two sheets tiled and aligned on the leg panel by panel.
Which parts of the calf hurt most?
The back of the knee, the thin skin high on the inner calf, and the lower calf where it narrows into the Achilles are the sharp zones, because skin is thin and bone or tendon sits close underneath. The muscle belly itself has depth under it and is one of the more tolerable areas on the leg.